Creating and sending a quote
Quotes are built the same way as invoices: pick a customer, add line items, review tax and totals, then send. The difference is that the customer signs off on the price before you do the work, and an accepted quote one-clicks into a work order.
Build the quote
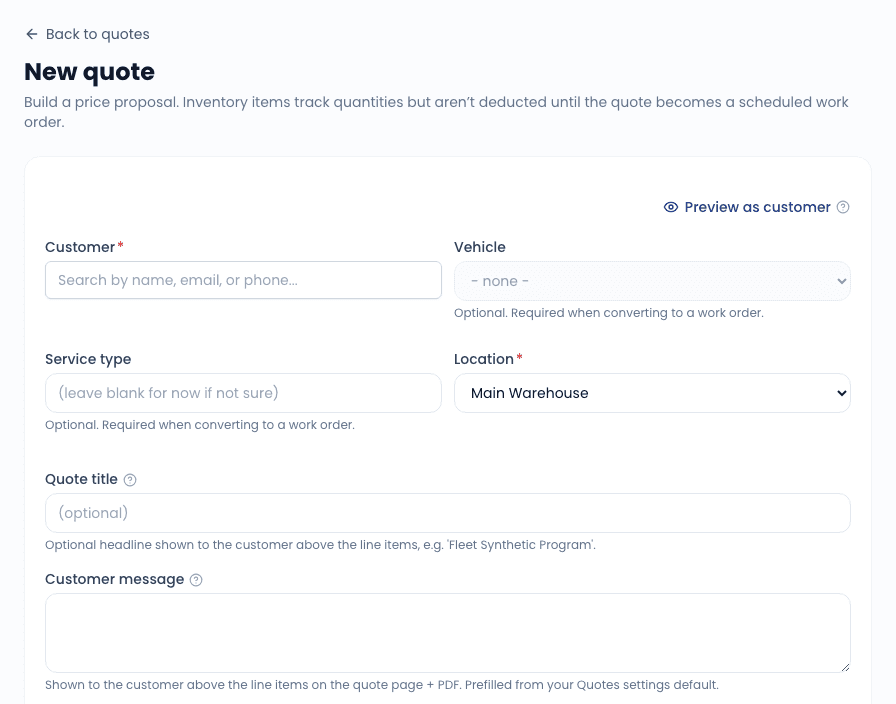
Click "New quote"
From the Quotes index, click New quote in the top-right. Alternatively, from any customer's detail page, click Actions -> New quote to start with the customer pre-filled.
Pick the customer (and optionally a vehicle)
The customer field is a typeahead. Start typing - results match name, phone, or email. If the customer has vehicles on file, the vehicle dropdown is enabled and pre-populated; pick the one this quote is for. For non-vehicle work (a shop fee, a non-mobile job), leave the vehicle field blank.
Pick a location
If you have multiple service locations, pick the one that will deliver the work. The choice drives the tax context (see below).
Add line items
The line builder lets you add four kinds of items:
- Service packages - your flat-rate canned jobs (full synthetic oil change, brake service). Configured in Settings -> Service Types.
- Add-ons - optional extras layered onto a package (filters, wiper blades). Configured in the same place.
- Parts - entered manually with custom price and description, or pulled from your inventory catalog.
- Fees - flat fees you charge regularly (disposal fee, after-hours surcharge). Configured in Service Types -> Fees.
The line search field auto-suggests across all four kinds; start typing and the relevant matches surface.
Two per-line options help the quote sell itself:
- Optional - marks the line as an add-on the customer can opt into on the quote page. Optional lines are excluded from the base total until the customer checks them.
- Section title - groups lines under a heading ("Recommended now", "Can wait until next visit").
Personalize the presentation
Everything here is optional, and all of it shows on the customer-facing quote page:
- Title - a headline for the quote ("Spring fleet service - 6 vans").
- Customer message - a free-form intro paragraph shown at the top of the quote.
- Hero image - a single image displayed above the line items.
- Gallery images - additional photos with captions, shown below the line items.
- Attachments - PDFs or images (10 MB max each) the customer can download.
- Per-line photos - attach a photo to an individual line item (the worn brake pad you are quoting to replace).
If you find yourself typing the same title and message every time, save them into a quote template in Settings -> Quotes.
Review tax and totals
Tax is computed based on the location's tax context (the rates configured in Settings -> Taxes and the customer's tax-exempt flag). Tax auto-applies the moment you add a line item - no extra step. The breakdown shows subtotal, each tax line, and total. If the customer is marked tax-exempt, the tax lines are zeroed and a note is added below the total.
Set "Valid until"
Defaults to today + the org default (set in Settings -> Quotes, default 14 days). Push it out for fleet accounts that take longer to approve, or pull it in for parts-volatile jobs where the price might move.
Save
You land on the quote detail page in Draft status. From here you can keep editing, send it, or delete it.
Send the quote
From the quote detail page, click Send. You get a dialog with three things to confirm:
- Email address - prefills from the customer record. Edit if you need to send to a different contact (the AP person on a fleet, for example).
- Phone number for SMS (optional) - if the customer has a phone on file and is SMS-opted-in, you can also send the quote link by text. The SMS body is short - just the link and your shop name - and gets sent on top of the email, not instead.
- Message - free-form note that goes at the top of the email body. Optional.
Click Send. The status flips to Sent. When the customer opens the link, the status auto-flips to Viewed.
The customer's experience
The customer gets an email (and SMS if you sent one) with a tokenized link to a public quote page. They do not need to log in. The page shows your branding, the itemized list, the totals, and three buttons: Accept, Request changes, and Decline.
- Accept - status flips to Accepted. You get a notification (configurable in Settings -> Notifications).
- Request changes - opens a note field. They explain what they want different; the note lands in the quote's activity log and status flips to Changes.
- Decline - status flips to Declined. You can re-open it manually if they change their mind.
Convert to a work order
Once the quote is Accepted, the detail page shows a Convert to work order button. Click it, pick a date/time and tech, and the line items, tax, and totals carry over to the new work order. The quote moves to Converted and links to the WO.
If the customer self-scheduled (you have Customer can self-schedule from quote enabled in Settings -> Quotes), the slot they picked is pre-filled on the work order form - you just confirm and save.
Saved drafts
A new quote you have not yet sent lives in Draft status. You can leave it and come back any time. The Quotes index shows drafts in the Draft filter. There is also a shortcut from the dashboard's "Recent drafts" panel.
If a quote has been sitting in Sent for 3 days with no customer activity, the system auto-creates a follow-up task assigned to the sender. See Quotes overview -> Automatic follow-up reminders for details.
Related
- Quotes overview - statuses, lifecycle, what the customer sees
- Quote settings - default validity, self-schedule toggle
- How invoicing works - the WO -> invoice -> payment chain
- Tasks - where auto-created quote follow-ups land